The Cloud Companion agent runs on an On-Premises Windows server to connect to locally shared printers.
For Business Central hosted by Microsoft or Fenwick, the service provides a path to print to local printers which are not directly accessible.
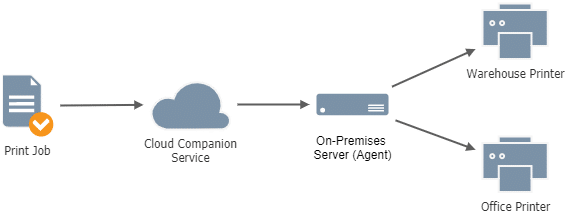
The agent doesn’t require any inbound port configuration, though must be able to contact the internet (at minimum TCP 443). If your network has restrictions on outbound connections, then exceptions must be configured to allow the agent to connect.
Server Agent Setup
You can install the agent on any networked server. We recommend avoiding installation on Domain Controllers. A dedicated machine is not necessary. You’ll want to use a machine that meets the following requirements:
- Windows Server 2016+ or Windows 10+
- .NET Framework v4.7.2 (recommended)
- NiceLabel PowerForms Suite incl. NiceLabel SDK (if you’re printing Labels via Label-It)
- Ghostscript (if you’re printing Reports from Business Central)
- Network or local access to the printers you wish to use
Installing the Agent
The agent installation will require administrative permissions and a service account.
Please raise a support request to receive your installation files, and for any assistance required with your installation.
- Run the software installer
- Follow the instructions on the installer to proceed with the installation.
- On the Agent Registration Information screen, enter the client ID and client key provided by Fenwick Software.
- Client ID: If you are unsure about the Client ID, the value can be found on and copied from the Print-It with Cloud Companion Setup page in Business Central.
- Client Key: Please contact Fenwick Software App Support if you have not received a key.
- On the Service Account Information, you will be prompted for service account credentials, or to use the built-in Network Service account
Note: You need to specify the service account with the full name including prefix such asDomainName\UserNameorComputerName\UserName. See below for more information about the service account. - Once done, choose Next and continue with the installation
After installation, install the Ghostscript and/or NiceLabel dependencies described below, if applicable.
Service Account Requirements
If you use a dedicated service account
- Enter the account name into the installer using the prefixed name:
DomainName\UserNameorComputerName\UserName(if it is a local computer account) - You must ensure that the service account has log on as a service enabled. You may assign this permission manually, or cause it to be automatically assigned by first installing the agent as Network Service and then updating the user account on the service through the Windows services list
- If you are using PDF report printing functionality, the service account must be a local administrator
- The service account password should be set to not expire. If the password is changed, then the credential needs to be updated through the Windows services list
If you use the built-in Network Service account
- PDF report printing functionality may not work properly
In both cases (Network Service or dedicated service account)
- The account must have network permissions to the printers you wish to use via Cloud Companion
A managed service account (MSA or gMSA) can also be used. First, run the installer using the Network Service option, and then set the account manually afterwards via the Windows services list.
Checking the Print Service
The installer will create a Windows service Fenwick Cloud Companion (Service Edition) in your server/local machine.
To check on the status of this service:
- Open the Start Menu & search for
services.msc - On the Services list, navigate to the Fenwick Cloud Companion (Service Edition) service entry.
- If the status of the service is not Running, right click on the entry and start the service. Ensure that the service is Startup Type is not set to Disabled.
Ghostscript for PDF/Report Printing
If you will use report printing via Cloud Companion the reports will be sent in PDF format and Ghostscript must be installed. Ghostscript can be downloaded here. Obtain the AGPL version.
In October 2023, the Ghostscript 10.02.0 release was discovered to cause printing failures. Use Ghostscript 10.01.2 or 9.56.1 instead. The problem is known to the Ghostscript team (link) and may be resolved in a version after 10.02.0.
NiceLabel for Label Printing
You will need to purchase the PowerForms Suite edition (or higher) to acquire a NiceLabel SDK license for label printing.
Only the Print feature is needed when installing NiceLabel. The Automation and Designer are not required to work with Cloud Companion, although this feature is needed if you would like to design or customise your own label on the Designer software.
Outbound Firewall Exceptions
The Cloud Companion agent must contact Azure services to perform its functions. If your network has restrictions on outbound connections, then exceptions must be configured to allow the agent to connect to certain IP addresses.
As these IP addresses vary, Fenwick will advise as needed.
Older Editions of Windows Server
While not supported, older versions of Windows Server may still work if TLS1.2 support is enabled:
You’ll require these patches if you experience an error similar to the one below:
System.Net.WebException: The underlying connection was closed: An unexpected error occurred on a send. ---> System.IO.IOException: Unable to read data from the transport connection: An existing connection was forcibly closed by the remote host. ---> System.Net.Sockets.SocketException: An existing connection was forcibly closed by the remote host
Installation on Multiple Servers
If you have multiple sites, you may need to install the agent on multiple servers. The agent can be installed on multiple different networks (i.e. multiple sites).
Please raise a support request to get more information on this option.
Installation Errors
Some known causes of this installation error are:
- Service account name has been entered without a prefix (
DomainName\UserNameorComputerName\UserName) - Service account is missing ‘Log on as a service’ permission
- The operating system does not support TLS1.2+
- The service from a prior installation has not been fully removed yet
- Check the services list for Fenwick Cloud Companion (Service Edition)
- A service can be stuck in a “pending for deletion” status. Some reasons for this are described here.
- The most common reasons are that you have the service list or task manager open. Once you close these, the service should be removed as expected
If you encounter an unexpected error during installation like the error above, please follow these steps to output the install log files:
- Run Windows PowerShell as Administrator
- Type in and run in PowerShell:
cd <path to the same directory as the .msi installer> - Run this command (update the msi filename to match your version):
msiexec /i Fenwick.CloudCompanion.ServerEdition.Installer-x64-v.1.0.0.msi /l*v install.log - This should automatically start up the installer again.
- Run through this installer and then reproduce the steps to get the error.
- Once you get the error again, exit out of the installer. There should be a .log file called “install.log” (which is a text file).
- Please send the file through to Fenwick App Support for assistance.
Managing which printers the agent can see
The agent will only be able to see printers which are available and installed for the user account that’s running the service.
The best way to be sure that Cloud Companion (Server Edition) can see printers is to install the printer while logged in as the service account.
If you need to add printers as a specific user, you can use one of the following methods:
Run Printer Install Wizard as Another User
- Start a new command prompt, using Run As (Ctrl + Shift while right clicking)
- Enter
rundll32 printui.dll,PrintUIEntry /iland complete the wizard
Install Printer for All Users of a Machine
To install a printer for all users of a machine, you can install globally using this command:
- Start a new command prompt, as an Administrator
- Enter
rundll32 printui.dll,PrintUIEntry /ga /n"\\server\printer"> - Restart the Spooler service (
net stop spooler,net start spooler)
Use Group Policy Printers via Computer Configuration
You can also use the Print Management to make managing printers in Group Policy simpler. We recommend deploying under the Computer configuration and not to a particular User.
- Create a new GPO policy
- Under Computer Configuration > Preferences > Control Panel Settings > Printers add the new printer.
Show available printers
If you run PowerShell as the service account (using psexec if you’re using a Managed Service Account) the following command will show you a list of available printers:
get-WmiObject -class Win32_printer | ft name, systemName, shareName
Setting printer defaults
To change the printer driver defaults for all users and for network users connecting to a shared printer:
- Start > Run > “control printers” > OK
- Right click printer, select Properties.
- Go to Advanced tab.
- Click Printing Defaults button.
- Change the settings.
Troubleshooting the Agent
Log files
Check the logs and supply them to Fenwick.
For MSI-based installations, logs are available in the C:\ProgramData\Fenwick Software\Cloud Companion (Service Edition)\log directory.
Or, if the agent has been installed via the legacy ZIP-based method, the logs are available in the log subdirectory of the folder which has Fenwick.CloudCompanion.ServerEdition.Service.exe.
If no log files are present, ensure that the service account has permissions to create and change files in the directory.
No print jobs are printing
- Ensure the Fenwick Cloud Companion (Server Edition) service is running
- If a Windows service does not start, then
- Ensure there is a valid credential set up on the service. If your service account password has expired, then the new password must be entered.
- Ensure that the agent files are still present in the installation directory. If you are unsure of the installation directory, it can be checked by opening the properties of the Fenwick Cloud Companion (Server Edition) service and examining the Path to executable property.
- If network errors are present in the log file, firewall rules may need to be created.
- If nothing is printed or logged when Business Central prints labels or documents, there may be a printer registration issue:
- In Business Central, review the Printer Integrations setup area. The Cloud ID field is important and must correspond to a valid and active printer.
- If multiple of the same printer are visible in the Cloud ID lookup, please contact Fenwick to have these cleaned up. Duplicates can occur if two agents have been installed
- During startup, the service agent logs out the Cloud IDs of all the printers it has detected. You can cross reference this against the Cloud IDs in the Printer Integrations area
Printing and print services are unreliable or slow
You may need to clear the Print Spooler if it contains older entries. This slows down the printer spooler service.
Printing will be unavailable while you take these steps. Any unprinted queue items will be lost.
- Stop the Print Spooler service via services.msc on the server managing the print queue
- Go to
%systemroot%\System32\Spool\Printersand clear all items in this folder. - Start the Print Spooler service again.
The Log File contains “This managed library is running under 64-bit process and requires 64-bit Ghostscript native library installation on this machine!”
Fenwick Cloud Companion is trying to print PDF documents, but Ghostscript has not been installed, or the wrong version has been installed (32-bit/64-bit). Review the installation steps.
Advanced Printer Investigation
Log review may show that the agent is receiving print requests, but physical printing is not working, or a failure is logged when the service agent communicates with Ghostscript, or the Windows print spooler, or NiceLabel.
Some issues which have been seen in the past are:
- Ghostscript may not work with printer names which are 30 characters or longer, or names which contain special characters such as long dash (“—”)
- Secure Print may prevent printing until the service account user has been authorised to use the printer. Performing a Test Print in Windows printer management as the service account user may present a Secure Print authorisation modal dialog
- PaperCut (and similar software) may halt print jobs at the spooler until authorised through the PaperCut software
- Printers installed by a non-administrative user may not print
- Invalid default paper size or tray settings in the printer’s preferences cause a printer dialog to appear (which causes a timeout to occur when the agent prints, because the agent does not have a UI)
Some advanced techniques for identifying issues are below.
When simulating printing or checking settings, it is important to test specifically as the service account user as there can be user-level settings affecting printing. Either log in to Windows as the service account user, or launch cmd as the service account user, and then launch printmanagement.msc.
- Log in to the machine as the service account user and install printers through this account. This is particularly relevant for USB-based printers.
- Use the Test Print function in Windows printer management.
- Ensure manual printing works via NiceLabel or a PDF viewer.
- Ensure the default printer preferences are correct (e.g. default tray, paper size, paper orientation).
- If there is a ‘resize to match’ setting, then this may help.
- Restart the ‘Print Spooler’ Windows service.
- For NiceLabel printing, try the official NiceLabel printer drivers.
- Try renaming the printer, removing special characters and ensuring the name is less than 30 characters. This can have the effect of de-associating/clearing corrupted printer settings.
- Enable detailed print logging.
- Enable through Event Viewer > Applications and Services Logs > Microsoft > Windows > Print Service. Right click on the ‘Operational’ log and use ‘Enable Log’. Low-level success and error information is logged here.
- If you receive a message such as “The print spooler failed to reopen an existing printer connection because it could not read the configuration information from the registry key <sid>\Printers\Connections. The print spooler could not open the registry key. This can occur if the registry key is corrupt or missing, or if the registry recently became unavailable.” then this may indicate a printer installation issue. Adding the registry key named in the message may resolve the problem
- Manually assign permissions to the service account on the print spooler folder
C:\Windows\system32\spool\PRINTERS\. - Execute the print via the ghostscript executable in Powershell, to observe behaviour (Fenwick can assist).
- Open Powershell as the service account user.
- Download a PDF of a BC report to test with.
- Prepare and execute a script similar to this (update the path to ghostscript, the printer name, and the path to the PDF).
"C:\Program Files\gs\gs9.56.1\bin\gswin64.exe" -dPrinted -dBATCH -dNOPAUSE -dNOSAFER -dNumCopies=1 -dFIXEDMEDIA -dFitPage -sDEVICE=mswinpr2 -sOutputFile="%printer%PrinterNameGoesHere" -f "C:\path\to\pdf.pdf" - If the print goes through without requiring any input from you, then Cloud Companion should be able to print via ghostscript without issue. If a printer selection prompt is shown, then there is a problem of some kind.
- Downgrade (or upgrade) if you are using ghostscript v10.02.0 as there is a known issue
Agent Configuration Options
The configuration file C:\ProgramData\Fenwick Software\Cloud Companion (Service Edition)\config.json contains the following options:
PrinterCheckIntervalsets how often the local printers will be re-checked for changes, and to be visible in Business Central.PrinterBlackListis a set of regular expressions that are used to exclude printers from being made available through Cloud Companion. By default, PDF, XPS and Fax printers are excluded.
After making configuration changes, the service will need to be restarted.
Upgrading the Agent
The recommended process to install a new version is:
- Back up the configuration file (
C:\ProgramData\Fenwick Software\Cloud Companion (Service Edition)\config.json) in case there has been modifications - Uninstall “Cloud Companion (Server Edition)” via Add or Remove Programs
- Install the new version MSI
- Compare and merge the new configuration file with the backed up file. If you make any changes, restart the service
Uninstalling and re-installing is more reliable than directly upgrading the installation via a new MSI version, because service account credentials cannot be re-entered during upgrade.
Legacy ZIP-Based Distribution
The following instructions do not apply if you have an MSI installation file.
Installation
Unzip the supplied ZIP package. The ZIP should be unpacked into a permanent directory, not a temporary location.
If Fenwick has not provided a pre-configured version for you, open the file config.json and specify these settings:
- Under the
CloudCompanionBrokerApisectionTenantIdApiKey
Open an elevated command prompt, navigate to the unzipped directory and run:
Fenwick.CloudCompanion.ServerEdition.Service.exe install
You will be prompted for service account credentials. If you are using an account without a password, you may leave the password field empty in the authentication prompt. This will install a Windows service named Fenwick Cloud Companion (Server Edition)
Run this command to start the service after installation:
Fenwick.CloudCompanion.ServerEdition.Service.exe start
Upgrading
To upgrade to the latest version of the Cloud Companion agent:
- Stop the Fenwick Cloud Companion (Server Edition) Windows service.
- Take a copy of the existing installation directory as a backup.
- Unzip the new package into the existing installation directory, overwriting the files.
- It is important that the
AgentId.jsonfile is kept. This file is created by the agent when it first runs and will not be overwritten when the new package is unzipped over the top of the existing files.
- It is important that the
- Start the Fenwick Cloud Companion (Server Edition) Windows service.
- Perform a test print from Business Central.
Removal
- Stop the Windows Service.
- At an elevated command prompt in the installation directory, run: Fenwick.CloudCompanion.ServerEdition.Service.exe uninstall
- You can delete the files from the directory once the service is removed.